Introduction
This post describes a high availability, all-active autoscaling solution based on NGINX Plus. (You can also use the open source NGINX software, except where noted.) This solution runs on the Google Compute Engine (GCE), which is the Google Cloud Platform (GCP) product for running workloads on virtual machines (VMs).
High availability, all-active auto scaling solutions are increasingly becoming the norm in the current DevOps landscape. High availability deployments use active health checks to restart unhealthy instances. Combined with an all-active solution, this ensures that there will always be an NGINX Plus server available for client access. At the same time, autoscaling helps reduce deployment costs by adjusting the number of instances to the right number for the current workload, based on a wide range of configurable parameters.
Manually setting up such a complex environment every time a new breaking change is introduced can prove to be tedious. As such, automating deployments is a key requirement for efficient DevOps workflows. This post, based on the original deployment guide found here, covers an automated solution to deploy highly available all-active autoscaling NGINX OSS instances functioning as a reverse proxy load balancer amongst multiple upstream NGINX OSS web server instances on GCE.
The overall schema of the deployment consists of three distinct NGINX Plus/OSS images:
- One image configured with NGINX Plus acting as reverse proxy load balancer
- Two images configured with NGINX OSS acting as the application web servers
(Note: For demo purposes, the configuration of these web servers is identical.)
Two instances of each load balancer and application web server images are deployed and configured for high availability via GCE health checks, with each load balancer instance proxied to each application web server instance. Finally, GCE startup and shutdown scripts are deployed in combination with the NGINX Plus upstream HTTP configuration API to provide a seamless auto scaling solution.
There are multiple tools that can be used to automate deployments. For the purpose of this guide, we use Packer and Terraform. Packer and Terraform are becoming increasingly popular tools amongst the DevOps community. Packer is in a stable state, but Terraform is still very much in active development. It has some limitations when working with Google Cloud.
- It is not yet possible to enable instance auto-healing (a key requirement for restarting unhealthy instances) using Terraform, as instance auto-healing is currently in a beta API state and Terraform can only access the GA API.
- Terraform is not able to pull images from the Google Cloud launcher, forcing us to create the NGINX Plus image using Packer instead of using the readily available NGINX Plus Google Cloud image. This means that for this solution to work, it is necessary to use the key and cert from a previously obtained NGINX Plus license.
Getting Started
- Install Packer.
- This solution was developed using Packer v1.0.4 and might not work if a different version of Packer is employed. We’ll strive to update the code if any breaking changes are introduced in a future release of Packer.
- Install Terraform.
- This solution was developed using Terraform v0.10.2 and might not work if a different version of Terraform is employed. We’ll strive to update the code if any breaking changes are introduced in a future release of Terraform.
- Create a Google Cloud account.
- Create a Google Cloud project.
- Download the corresponding credentials for the previously created project. Terraform has a good guide on how to do this. (You will need to wait until the Compute Engine has initialized before you are able to download the default account credentials. Copy and rename the credentials to ~/.gcloud/gcloud_credentials.json.
- Install the Google Cloud SDK.
- Install the Google Cloud SDK beta commands.
- Clone or download the files in the Packer Terraform All Active Nginx Plus LB folder in the NGINX Demos GitHub repo.
- Change variables.tf and packer.json to include your project id and the region/zone of your project credentials file path.
- Copy your NGINX Plus crt and key into the packer/certs subfolder.
- Open a terminal, navigate to the location where you cloned the repository, and run
./setup.sh. - Once you’re done with the demo, and/or you want to delete the Google Cloud environment you’ve just created, run
./cleanup.sh.
Overall Image Structure
Load Balancer
The load balancer image contains an installation of NGINX Plus set up to act as a reverse proxy load balancer. Active health-checks and the upstream API are enabled as part of this configuration. The status live monitoring dashboard is also configured at port 8080 and can be accessed via http://external_ip:8080/status.html.
Application Web Server
The application web server image contains an installation of NGINX OSS set up to act as a static web server. As part of the configuration file, several parameters are set using the sub_filter NGINX directive. This enables the landing HTML site to reflect various values corresponding to the current NGINX installation.
Packer Configuration
Packer is an open source tool for creating identical machine images for multiple platforms from a single source JSON configuration file. These machine images can then be readily used to quickly create new running instances on a variety of providers.
In this guide, Packer is used to create three distinct machine images:
- A machine image configured with NGINX Plus acting as reverse proxy Load Balancer
- Two machine images configured with NGINX OSS acting as a web server
Before being able to run the script, follow these steps:
- Create a new Google Cloud project.
- Download your GCE credentials for that project into ~/.gcloud/gcloud_credentials.json.
- Edit the variables to use your project_id and preferred deployment zone.
"variables": { "home": "{{env `HOME`}}", "project_id": "all-active-nginx-plus-lb", "zone": "us-west1-a" }, - Copy your NGINX Plus certs to the /certs subfolder.
Overall Deployment Structure
The overall deployment structure follows closely the original guide. It consists of three GCE instance templates, each using one of the machine images created with Packer.
Each of these GCE instance templates is in turn managed by a GCE group instance manager. A firewall is setup to allow access to ports 80, and 8080 on all NGINX Plus GCE instances.
To increase safety and reduce complexity, public IP access is limited to only allow access to the load balancer instances. The load balancer group manager is assigned to a backend pool balancer, and an external static IP is configured to forward all incoming connections to the backend pool balancer.
Deploying the Machine Images with Terraform
Terraform is an open source tool for building, changing, and versioning infrastructure safely and efficiently. Terraform can manage existing and popular service providers as well as custom in-house solutions.
Configuration files describe to Terraform the components needed to run a single application or your entire datacenter. Terraform generates an execution plan describing what it will do to reach the desired state and then executes it to build the described infrastructure. As the configuration changes, Terraform is able to determine what changed and create incremental execution plans which can be applied.
In this blog post, I use Terraform to deploy the machine images previously created using Packer. The Terraform scripts are separated into various ‘.tf’ files, with each file responsible for a set of responsibilities. Before being able to run the Terraform scripts, follow these steps:
- Create a new Google Cloud project.
- Download your GCE credentials for that project into ~/.gcloud/gcloud_credentials.json.
- Edit variables.tf to use your project_id, preferred deployment region, and preferred deployment region zone.
variable "project_id" {
  description = "The ID of the Google Cloud project"
  default = "all-active-nginx-plus-lb"
}
variable "region" {
  description = "The region in which to deploy the Google Cloud project"
  default = "us-west1"
}

variable "region_zone" {
  description = "The region zone in which to deploy the Google Cloud project"
  default = "us-west1-a"
}

variable "credentials_file_path" {
  description = "Path to the JSON file used to describe your account credentials"
  default = "~/.gcloud/gcloud_credentials.json"
}
High Availability
Setup high availability using health-checks in healthcheck.tf. The interval between health checks can be modified as necessary.
# Configure HTTP Health Checks for NGINX
resource "google_compute_http_health_check" "default" {
  name = "nginx-http-health-check"
  description = "Basic HTTP health check to monitor NGINX instances"
  request_path = "/status-old.html"
  check_interval_sec = 10
  timeout_sec = 10
  healthy_threshold = 2
  unhealthy_threshold = 10
}
When configuring each instance group manager, use these health-checks for setting up instance auto healing for each instance using the gcloud beta cli.
provisioner "local-exec" {
    command = "gcloud beta compute instance-groups managed set-autohealing ${google_compute_instance_group_manager.app-1.id} --initial-delay=300 --http-health-check=${google_compute_http_health_check.default.id} --zone=${var.region_zone}"
 }
Auto Scaling and Service Discovery
Auto Scaling
Autoscaling is set up in ‘autoscaler.tf’ for each instance group manager.
# Create a Google autoscaler for the LB instance group manager
resource "google_compute_autoscaler" "lb" {
  name = "nginx-plus-lb-autoscaler"
  zone = "${var.region_zone}"
  target = "${google_compute_instance_group_manager.lb.self_link}"
  autoscaling_policy {
    max_replicas = 5
    min_replicas = 2
    cpu_utilization {
      target = 0.5
    }
  }
}
Tweak the autoscaling policy to suit your needs, as described in the Terraform documentation. In this demo, the default autoscaling policy spawns a new instance whenever available instances exceed 50% CPU usage, up to a max number of five instances per group manager.
Service Discovery
NGINX Plus needs to be able to detect newly added instances from the GCE Auto Scaler. To do this, the NGINX Plus API is used in combination with GCE instance startup and shutdown scripts and the GCloud API. Each time a new load balancer instance is added, the internal IP of each application instance is obtained and added to the load balancer upstream configuration. Each time a new application instance is added, the internal IP of that instance is added to all available load balancer instances; conversely, the opposite happens when an application instance is removed.
While the implementation details are not the focus of this post, it should be noted that it is necessary for each instance to follow certain naming conventions for the script to work:
- Load balancer instances should contain lb in their name, and not contain app
- Application instances should contain app in their name, and not contain lb
Terraform Dependencies
One of the main features of Terraform is its ability to create a dependency graph reflecting how each of the individual components and scripts of Terraform work together to achieve the target deployment state. All Terraform deployments start at the root node. From this node the arrows can be followed in order, with each node waiting until the component in the previous node has been deployed.
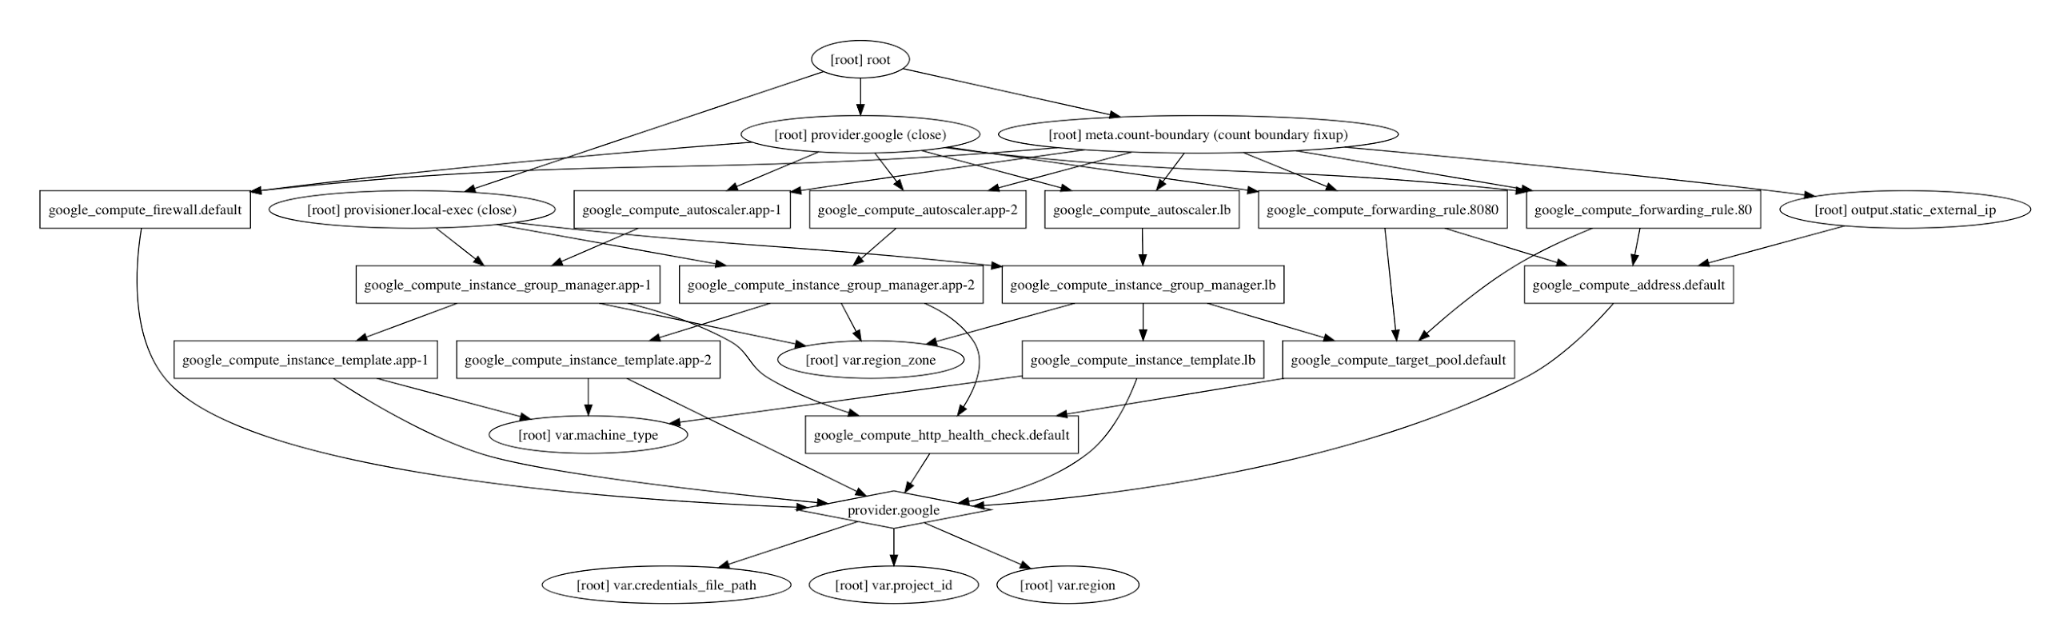
(Click the image to open a larger version.)
Conclusion
In this guide we have covered how to automate a high availability, all-active auto-scaling NGINX Plus solution on Google Cloud Engine (GCE) using Packer and Terraform.