There is an incredible amount of information out there about installing WordPress – a Google search for “WordPress install” yields 488,000 results as of this writing. Yet among those results are very few tutorials that comprehensively explain how to install both WordPress and the underlying operating system in a way that’s maintainable in the long term. Perhaps that’s because the right configuration varies so much depending on specific needs, or perhaps it’s because a comprehensive guide doesn’t make for an easy-to-read article.
In this post we’re trying to combine the best of both worlds, by providing a bash script that automates WordPress installation on Ubuntu and walking through it to explain what each section does and the design trade‑offs we made. (If you are an advanced user, you may want to skip this post and go directly to the script, downloading and modifying it for your environment.) The resulting WordPress installation is scriptable, supports Let’s Encrypt, uses NGINX Unit, and has production‑ready settings.
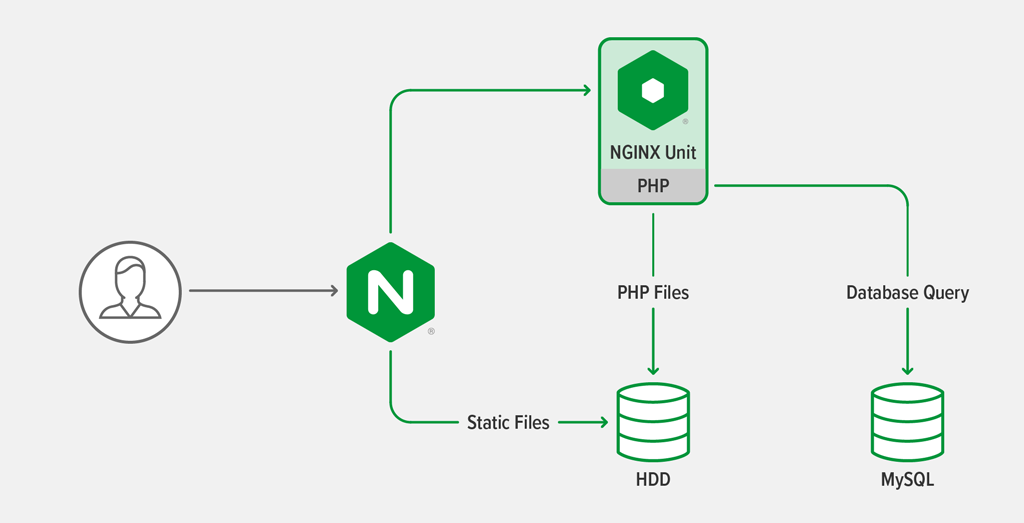
We’re building on the architecture for deploying WordPress with NGINX Unit that’s described in an earlier post on our blog, while also installing and configuring features not covered there (or in many other tutorials):
- The WordPress CLI
- Let’s Encrypt and TLS/SSL certificates
- Automated Let’s Encrypt renewals
- NGINX caching
- NGINX compression
- NGINX HTTPS and HTTP/2
- Process automation
This post describes setting up WordPress on a single node where the static asset web server, PHP processing server, and database are co‑located. Installation of a multi‑host, multi‑service WordPress configuration is a potential future topic. What else would you like us to cover in a future post? Let us know in the comments section at the end of the blog!
Prerequisites
- A compute instance – container (LXC or LXD), virtual machine, or bare metal machine – with at least 512 MB of available memory, running Ubuntu 18.04 or later
- Ports 80 and 443 on the compute instance are open to the Internet
- A domain name already associated with the compute instance’s public IP address
rootprivileges or equivalent access viasudo
Architecture Overview
The application architecture is the same as described in the previous blog post: a three‑tier web application. It includes PHP scripts that must be executed by a PHP processor and static files that have to be delivered by a web server.
General Principles
- Many of the configuration commands in the script are wrapped in conditionals (
ifstatements), for idempotency: the script can run multiple times without risk of changing settings that are already correct. - The script installs software from repositories wherever possible. This enables you to apply security patches to the system with a single command (for Ubuntu,
aptupgrade). - The commands make a best effort to detect if they are running in a container and change their configuration accordingly.
- When specifying the number of processes or threads to run in the configuration, the script provides a best guess of automatic configuration parameters that work in containers, virtual machines, or bare metal machines (on line 278 for NGINX Unit and line 306 for NGINX).
- We’ve written the configuration with an automation‑first approach, which we hope can serve as a model for creating your own reusable infrastructure as code.
- All commands run as
rootbecause they change the core system configuration, but in the runtime state WordPress runs under a regular user identity.
Setting Environment Variables
Before running the script, set the following environment variables.
WORDPRESS_DB_PASSWORD– The password for the WordPress database.WORDPRESS_ADMIN_USER– The username of the WordPress administrator.WORDPRESS_ADMIN_PASSWORD– The password for the WordPress administrator.WORDPRESS_ADMIN_EMAIL– The email address of the WordPress administrator.WORDPRESS_URL– The full URL for the WordPress site, starting with https://.LETS_ENCRYPT_STAGING– Blank by default, but set to1if you are using staging Let’s Encrypt servers, which is necessary when frequently testing new deployments of your configuration. Otherwise, Let’s Encrypt might block your IP address temporarily for making excessive requests.
The script checks that the WordPress‑related variables are set and exits if any are not (lines 8–42, not shown here). Lines 572–576 check the value of LETS_ENCRYPT_STAGING.
Setting Derived Environment Variables
The script (lines 55–61, not shown here) sets the following environment variables, either to a hardcoded value or a value derived from variables you set in the previous section.
DEBIAN_FRONTEND="noninteractive"– Indicates to applications that an automated script is executing commands and no user interaction is possible.WORDPRESS_CLI_VERSION="2.4.0"– The version of the WordPress CLI to download.WORDPRESS_CLI_MD5= "dedd5a662b80cda66e9e25d44c23b25c"– The cryptographic checksum for the WordPress CLI 2.4.0 binary (the version specified by theWORDPRESS_CLI_VERSIONvariable). Line 162 uses the value to verify that the correct WordPress CLI version was downloaded.UPLOAD_MAX_FILESIZE="16M"– The maximum size of a file that can be uploaded to WordPress. This setting is used in several places in the configuration and it is useful to have it centrally defined.TLS_HOSTNAME= "$(echo ${WORDPRESS_URL} | cut -d'/' -f3)"– The system’s addressable hostname, extracted from theWORDPRESS_URLvariable. It is used to fetch the appropriate TLS/SSL certificates from Let’s Encrypt and when WordPress needs to ping itself (see Adding the WordPress Site Hostname to /etc/hosts).NGINX_CONF_DIR="/etc/nginx"– The path to the directory containing the NGINX configuration and the primary configuration file, nginx.conf.CERT_DIR="/etc/letsencrypt/live/${TLS_HOSTNAME}"– The path to the Let’s Encrypt certificates for the WordPress site’s hostname, derived from theTLS_HOSTNAMEvariable.
Assigning the WordPress Site Hostname to the Compute Instance
The script sets the hostname of the compute instance to match the domain name of the WordPress site. This is optional and not needed in every configuration, but is useful when sending outgoing emails via SMTP in a single‑host setup like the one configured by the script.
Adding the WordPress Site Hostname to /etc/hosts
The WP‑Cron plug‑in is used by WordPress to run scheduled tasks, and requires that WordPress can ping itself over HTTP. To ensure WP‑Cron works well in all environments, the script adds an entry to /etc/hosts so that WordPress can route to itself over the local loopback interface.
Installing Tools Needed for Later Steps
Later parts of the script use certain utilities and assume the repository index is updated. We update the repo index (line 77) and install the required tools at this point (lines 78–84).
Adding the NGINX Unit and NGINX Open Source Repositories
The script installs NGINX Unit and NGINX Open Source from the official NGINX repositories to ensure we always have the latest security updates and bug fixes.
Here the script installs the NGINX Unit repo (lines 87–91) and NGINX Open Source repo (lines 94–98) by adding a signing key to the system and a file to the apt configuration that defines the repository’s location on the Internet.
Actual installation of NGINX Unit and NGINX Open source happens in the next section. We’re adding the repositories beforehand to avoid updating metadata multiple times, thereby making the overall installation faster.
Installing NGINX, NGINX Unit, PHP MariaDB, Certbot (Let’s Encrypt), and Dependencies
With all the repositories in place, we update the repository metadata and install the applications. The packages installed by the script include the PHP extensions that are recommended when running WordPress.
Configuring PHP for Use with NGINX Unit and WordPress
The script creates a configuration file in the PHP conf.d directory (lines 136–147). It sets the maximum size of uploaded files for PHP (line 142), directs PHP errors to STDERR (line 145) so that they get recorded in the NGINX Unit log, and restarts NGINX Unit (line 151).
Initializing the WordPress MariaDB Database
We’ve opted to use MariaDB instead of MySQL as the WordPress database. MariaDB has a more active open source community behind it and arguably offers better performance out of the box.
The script initializes the new database and creates credentials for WordPress to access it over the local loopback address.
Installing the WordPress CLI Utility
Now the script installs the WP‑CLI utility. Using it to install and manage WordPress gives you full control over WordPress configuration without having to manually modify files, update the database, or navigate to the WordPress administrator’s panel. You can also use it to install themes or plug‑ins, and to upgrade WordPress.
Installing and Configuring WordPress
The script installs the latest version of WordPress in the /var/www/wordpress directory and configures these settings:
- The database connects over the Unix domain socket loopback interface instead of the TCP loopback interface, to reduce the amount of TCP traffic (line 175).
- WordPress adds the https:// prefix to URLs when clients connect to NGINX over HTTPS, and passes the remote hostname (as provided by NGINX) to PHP. We use a snippet of PHP code for this configuration (lines 180–189).
- WordPress requires HTTPS for login (line 194).
- The default URL structure for WordPress is resource‑based (line 201).
- Correct filesystem permissions are applied to the WordPress directory (lines 207–210).
Configuring NGINX Unit
The script configures NGINX Unit to run PHP and handle WordPress paths, isolates PHP process namespaces, and tunes performance settings. There are three noteworthy features:
-
Namespace support is conditionally defined, based on whether the script is being run in a container (lines 213–224). This is necessary because most container configurations do not support running additional containers inside of themselves.
-
When namespace support is enabled, the
networknamespace is disabled (line 218). This is necessary to enable WordPress both to hit its own endpoints and call out to the Internet. -
The maximum number of processes is calculated (lines 226–228) using the following algorithm: (Available memory with MariaDB and NGINX Unit running) / (PHP memory limit + 5). The value is then set in the NGINX Unit configuration on lines 277–280.
This value ensures there are always at least two PHP processes running, which is important because WordPress makes many asynchronous callouts to itself and without the additional process, operations like WP‑Cron fail. You may need to increase or decrease this setting based on your particular WordPress configuration, because the setting generated here is conservative. On many production systems, settings between 10 and 100 are common.
Configuring NGINX
- Configuring Core NGINX Parameters
- Configuring NGINX Compression Settings
- Configuring NGINX Parameters for WordPress
Configuring Core NGINX Parameters
The script creates a directory for NGINX cache directory (line 301), then creates the main NGINX nginx.conf configuration file (lines 304–341). Among the configuration settings are the number of NGINX worker processes (line 306) and maximum upload size (line 325). Line 329 imports the compression configuration defined in the next section, and lines 332–337 set caching parameters.
Configuring NGINX Compression Settings
Compressing content on the fly before sending it to clients is a good way to improve website performance, but only if compression is configured correctly. The script uses a configuration (lines 346–414) from the h5bp repository on GitHub.
Configuring NGINX Parameters for WordPress
Next the script creates an NGINX configuration file called default.conf in the conf.d directory with settings for WordPress (lines 417–541). The configuration:
- Enables TLS certificates obtained from Let’s Encrypt via Certbot (lines 445–447; for the Certbot configuration, see the next section)
- Implements TLS security settings defined as best practices by Let’s Encrypt (lines 449–454)
- Enables caching of proxied requests for 1 hour by default (line 458)
- Disables access logging, as well as error logging when the asset is not found, for two commonly requested files, favicon.ico and robots.txt (lines 465–474)
- Denies access to hidden files and certain .php files, to prevent illegal access or inadvertent execution (lines 476–500)
- Disables access logging of static file content and font files (lines 503–510)
- Sets the
Access-Control-Allow-Originheader for font files (line 508) - Applies routing settings for the index.php file and other static files (lines 512–539)
Configuring Certbot for Let’s Encrypt Certificates and Auto Renewal
Certbot is a free tool from the Electronic Frontier Foundation (EFF) that obtains and auto‑renews TLS certificates from Let’s Encrypt. The script performs the following actions which configure Certbot to handle Let’s Encrypt certificates for NGINX:
- Stops NGINX (line 544)
- Downloads TLS parameters with the currently recommended settings (lines 550–564)
- Runs Certbot to retrieve the TLS certificates for the site (lines 578–585)
- Restarts NGINX to use the TLS certificates (line 588)
- Configures Certbot to run every day at 3:24 a.m. and check whether the TLS certificates need to be renewed; if so, it downloads the new certifications and reloads NGINX (lines 591–594)
Customizing Your WordPress Site
We’ve explained how our bash script configures NGINX Open Source and NGINX Unit to serve a production‑ready website with TLS/SSL enabled. Depending on your needs, you might want to customize your site further:
- Enable Brotli, for better on-the-fly compression performance over HTTPS
- Install ModSecurity with WordPress rules to prevent automated attacks on your site
- Set up a backup procedure for WordPress that works for your needs
- Protect your WordPress installation with AppArmor (on Ubuntu)
- Install Postfix or
msmtpso that WordPress can send outbound emails - Benchmark your site to get an understanding of how much traffic it can support
For even better website performance, consider upgrading to NGINX Plus, our enterprise‑grade, commercially supported product based on NGINX Open Source. NGINX Plus subscribers get the dynamically loaded Brotli module, and (at an additional cost) the NGINX ModSecurity WAF. We also offer NGINX App Protect, a WAF module for NGINX Plus based on F5’s industry‑leading security technology.
Want to try out the script with NGINX Plus? Start your free 30-day trial today or contact us to discuss your use cases.